
Thank you for purchasing The Architect of Predictions! (Also known as “TAP”).
In the following sections you’ll discover the fundamentals of TAP and learn how you can use this powerful tool to build your own predictions and effects.
If you are already familiar with PhotoPrediction, (another app I developed which has been available since 2012 on the App Store), you already know the basic effect: the magician asks the spectator to name something (a card, a number, etc) only to reveal that, prior to that date, he had already made a prediction using his cellphone’s camera and the prediction is right there in his Camera Roll.
Ever since the launch of PhotoPrediction in 2012, I've been thinking how I could make it easier to create custom effects. One thing that has always bothered me was having to take a picture for each and every out. Ever since I've been working on the TAP concept, I’ve been looking at all the possible ways a user could interact with iOS and I tested out a few solutions, but one of them stood out: the PIN unlocking process. It allowed me to come up with some of the other interesting ideas implemented in the app, such as the custom calculation of digits and multiple inputs. Shortly after the pre-launch of TAP, Greg Rostami and Ritchie Court pointed out to me that the PIN input method was already used in Angelo Carbone’s Magic SMS app. So a special thanks goes to Angelo, who was the first to publish this method and who has very kindly allowed me to use it in TAP.
That said, while PhotoPrediction allows up to 129 outs and you have to take all the necessary pictures to create an effect, in TAP you can have virtually INFINITE OUTS, using just one picture. And that single picture can reveal one or even multiple predictions. Sounds good? :D
Basically “The Architect of Predictions” is a mini image editor. It is possible to create montages using playing cards, images and/or text. This montage will be finalized at the time of performance using the spectator's choices and will be saved immediately to your Camera Roll. When the image is saved, the application closes itself and you end up entirely clean. And all this is done in front of the spectator in a completely imperceptible way. ;)
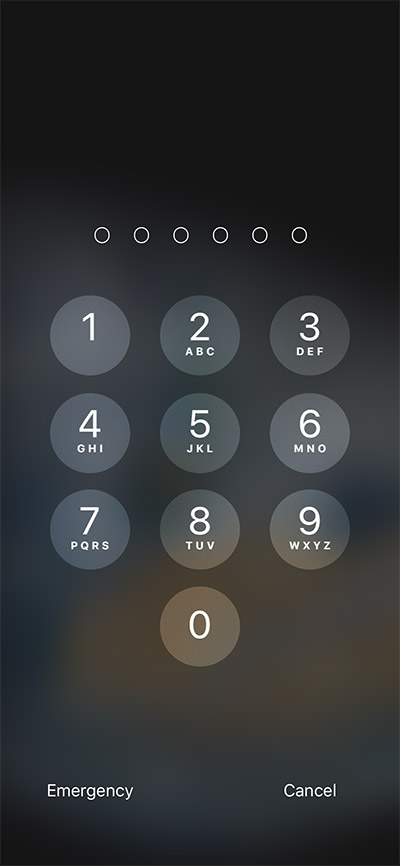
When you start the effect, a fake lock screen is presented, as if your device is locked. This is where you will input the spectator’s choices, as if it were your passcode. After that, an unlock animation will be shown, the prediction picture will be generated and saved to your Camera Roll and the app will close itself, transitioning invisibly between the app's fake homescreen and your real one.
Let’s start by looking at all the available options and how you can create your own effects.
Before you begin, it's important that you go to the Settings screen to define some important things that will be used in all your effects:
Here you can translate the keywords that will be used during the effect to your own language. More information on this later.
To make your fake lock screen look like your real one, you must import a screenshot of your actual lock screen. This picture will be shown blurred below the numberpad.
To make your unlock animation look like the real thing too, you must import a screenshot of your homescreen (a.k.a Springboard).
Press the Home button and the Lock button at the same time. If your device doesn’t have a Home button (iPhone X and superior), use your Volume Up button instead (Volume Up + Lock button).
To take the screenshot of your Homescreen, choose the page where your app TAP is located. This way the transition between the fake homescreen and the real one will not be noted.
Let's create our first project to understand how TAP works.
On the Projects screen, press the button “+” located in the upper right corner. You have 2 options: create a project from scratch or import one from the gallery. For now let's create a project from scratch.
Each project is divided, basically, into 2 parts:
Here the magician defines how he will enter the prediction data.
This is where the montage is created.

The first thing that you should insert into your project are inputs, which will allow you to enter the prediction data that will appear in the final image. You can create multiple inputs, based on the PIN digits or calculations. Calm down, do not despair! You will soon see how easy it is to understand.
Press the central button “+” on the tab “Inputs” to create a new input. The 4 principal types are:
There is a 5th input type: the manual input (pre-show), that doesn't use any digits, but we will talk about it later.
If you're subscribed of TAP PRO, you can also add inputs from Inject, WikiTest and Earworm (learn more about TAP PRO under Settings > TAP PRO).
After choosing the input type, it's time to decide how many (and which) digits are going to be used by it. The amount of digits used will define how many outs you may have on this input (except for a card input). For example: with 1 digit you can enter any number between 0 and 9. However, with 2 digits, you can enter any number between 0 and 99 and so on. Let's see the limits of each input:
To set the digits, tap the circles located on the upper part of the screen. They will be assigned a color and display a number, indicating the order in which the digits were selected.
You can also create inputs without digits, using only calculations. We'll talk about this later on.
The next screen will show the options for the selected input:
By selecting this option, the number 0 will be interpreted as 10, the "00" as "100" and so on. If disabled, the "0" will be used as "0" itself.
(default: enabled)
When enabled, the displayed number of the input on text outputs is padded out with zeros, up to the number of digits specified for that input. So, when entering the number "42" for a 3-digit number input, for example, it will be displayed as "042". This option only
(default: disabled)
If you are using 2 digits for a card input, you have to choose a stack (memorized deck) that you master to input the card. In default stack, entering 18 would result in a King of Clubs.
(default: Juan Tamariz's Mnemonica)
If you are using 3 digits for a card input, you can choose the suit order you prefer to use. In default order, entering 113 would result in a Jack of Clubs and entering 011 would result in a Ace of Spades, for example.
(default: SHoCkeD - 1: Spades, 2: Hearts, 3: Clubs and 4: Diamonds)
If you are using 1 digit for a card input, you must use a number between 1 and 5 (inclusive), and the result will be a ESP card (circle, cross, waves, square or star).
Here you enter the words you want to use. The maximum words allowed depends on how many digits you are using for the input. By swiping the "Words" row to the left, you can copy the words (if there is any), so you can paste it in another input if you want. The "Paste" option won't be shown if you don't have any words copied or if the target input has less digits than the original one.
Here you import the images you want to use. The maximum images allowed depends on how many digits you are using for the input.
Apart from these specific options for each input, there are some common options for all:
The “name” of the input, like a variable. The app will use this variable to access the information you enter on the fake lockscreen. More information about the identifier later.
This option should be used if you want the entered number to be calculated in any way before being used. We’ll see more about this later.
After setting your input options, tap the central button to save it. You'll see your new input in the list.
If you want to delete an input, swipe it to the left in the list and choose "Delete".
You can also reorder your inputs. To do so, tap the "Reorder" button. You can drag the digits to change their order or move your inputs up or down in the list.
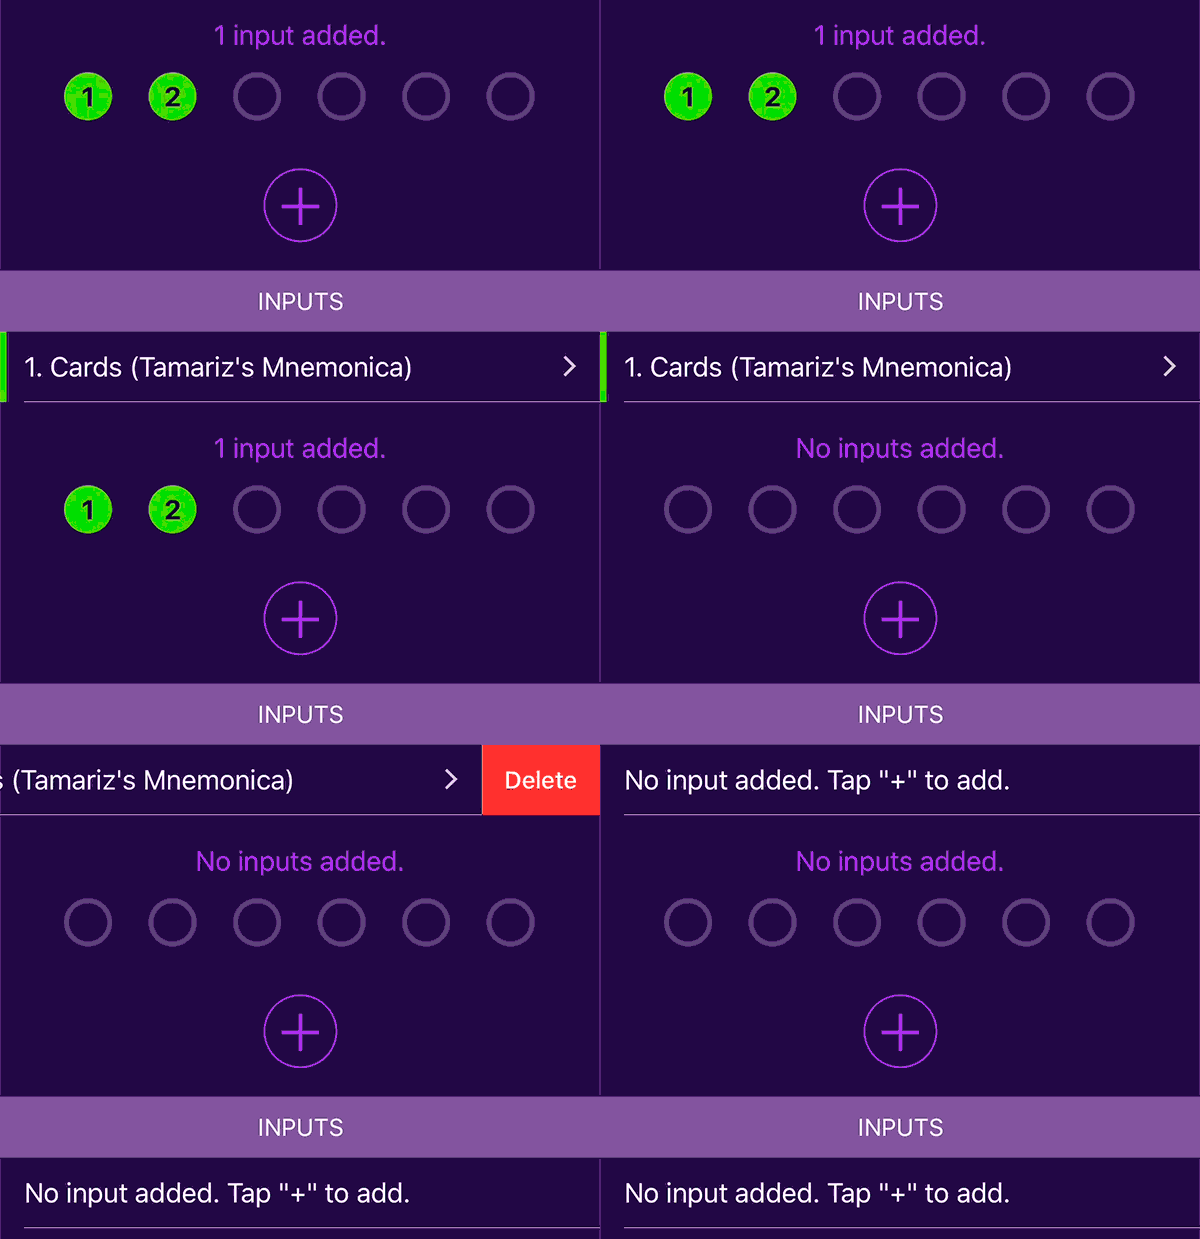
So far, so good, but... What if I want to create an input based on another one? Like predicting a sequence of 3 cards from a stacked deck, by inputting only the first card? Yes, you can do it!
Let's say you want to predict 3 cards. You're using a stacked deck and you'll "force" your spectator to choose 3 cards together. Of course you can use 2 digits per card, so you'll input 6 digits and voila. But we can do better: let's allow the app to calculate the next cards based on the first one!
To do this, create your desired input as usual, but instead of selecting digits, just tap the center rectangular button.

This will skip the digits selection. Using this method you'll be able to add up to 10,000 items, either as image or word inputs. Number inputs have no limit. In our example, we're creating a card input, so we need to decide which type of card type we'll be using:
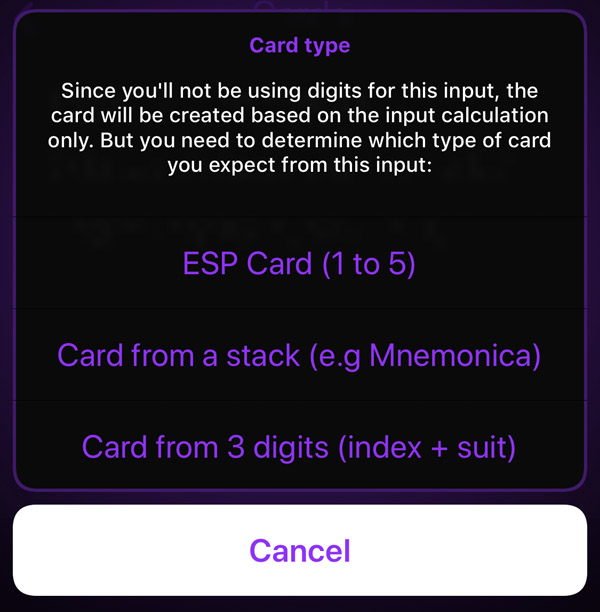
An Input with no digits must have some form of calculation enabled, otherwise it will have no value at all. Let's understand how calculations work!
When you enable the “Calculate” option of an input, a screen is shown where you can create a calculation for that input.
Calculations are created using math symbols and variables. These variables are, actually, the identifiers, as defined for each input, in the format $identifier; - ‘$’ (no quotes) followed by the identifier, (as defined for that input), followed by ‘;’ (semicolon). At the time of the performance, the identifiers will be replaced by their input values and the result of the expression will be used for that input.
Inputs are calculated in order (top to bottom), so you'll only see compatible inputs above the keyboard when editing your calculation. This means that you can't use inputs which are below the expression that you are editing, but you can always reorder your inputs accordingly, if you need to.
The calculation can be done in 2 ways:
The number is calculated using the desired expression. You can edit this field for the expression that you want to use. Assuming you're working on a number input with 2 digits and the identifier "number1" , let's see an example:
Number = $number1; - 20
This way, typing a passcode like this:
The "57" will be calculated using the set expression ($number1; - 20) and the result (37) will be used by the app.
This can be useful when you need to treat the data before to use it.
If you’re using an input where you need a year between 1900 and 2000, you can use only 2 digits and set a calculation like this:
Number = $number1; + 1900
If you need to make an input based on another one like in our initial example, you can do it using the respective variable.
Assuming you already have a card input using 2 digits with the identifier card1, and you want to have a new input with the next card from the stack: all you have to do is to create a new card input with no digits (card2) and enable a calculation for it like this:
Number = $card1; + 1
The number is calculated using a condition. In this option you can choose a condition and create 2 different expressions. The best way to understand the conditional calculation is by seeing a practical example:
Let's work on our last example, creating a second card input based on the first one. Notice the expression can create an error: if you try to put the number 52 on the first input the second one won't work, since 52 + 1 is 53 and there is no card in 53rd position. We can solve this using a conditional calculation:
$card1; is equal to 52 $card1; + 1
That is, if you type a number equal to 52 in the card1 input, the card2 input will result in 1 (expression “THEN”: number = 1). Otherwise the number that will be used is the inserted by the card1 input + 1 (expression “ELSE”: $card1; + 1).
Another example, where you want to insert a number between, say, 1921 and 2020, by entering only 2 digits:
$number1; is greater than 20 $number1; + 1900 $number1; + 2000
To create calculation expressions, besides the variables from inputs, some buttons are shown above your keyboard:
The percentage symbol is used as a modulus, that is, the remainder of the division.
$number1; % 10
By assuming this number1 input uses 2 digits, the result of the expression will be the rest of the division on the input value by 10.
i.e: Typing 42 would result in 2, since 42 divided by 10 is 4 and the remainder of this division is 2.
There are two global variables you can use in your calculations: $NOW and $TIME, but we'll talk about this a bit later on.
For now, we have decided how we’ll use the digits to input the spectator’s choices, so let’s move on and define how this info will be used. It’s time to learn how to use the Outputs!

Tap the “Outputs” tab. The first thing we’ll define is the base image, that is, the image in the background of our prediction. This picture will normally be a picture you've taken with blank spots where we’ll insert our elements. These elements will be filled in at the time of the performance, based on the inputs you entered.
Tap the button “Tap to choose the base image” and select the base image of your prediction in your Camera Roll, or take a new one using the app. In this example we have an opened notebook and a blank card.
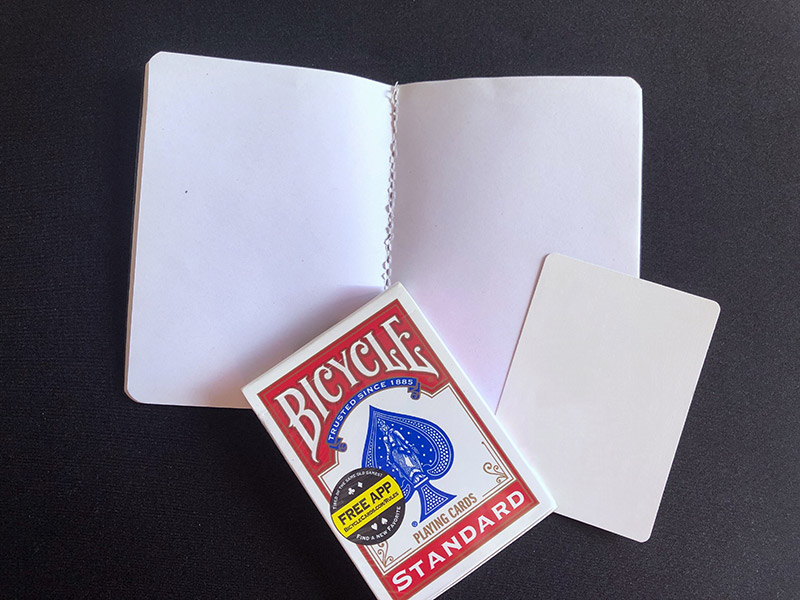
We can create outputs to put some text in the notebook and a face on the blank card. And, as with the inputs, we have some output types to choose from:
Used to overlay text on your base image. You can use variables in your text, that will be replaced by the correct values, based on the inputs entered on the fake screen.
Used to overlay a card’s face on your base image. Normally it will be applied on a blank card in your picture but, of course, you can get creative!
Used to overlay a picture on your base image.
Exclusive for TAP PRO users, this output overlays a QR Code on your base image. (Learn more about the QR Code Output under Settings > TAP PRO)
Tap the “+” button in the bottom left corner and select the output you want to add. The output will be created and you may be asked which input you want it linked to. You can change the linked input at any time.
The image output must be linked to a image input. The same occurs with card outputs: they have to be linked to a card input.
The Text and QR Code Outputs don’t need to be linked to any specific input. You’ll be using variables to insert input data in the text.
In the upper portion of the screen you’ll see your prediction project, with the base image and the outputs layers.
By selecting an output in the list right below, you can move each of the corners of the layer to distort it and position it correctly.
At the top you can choose how you want to edit the layer (distort, move and scale or rotate) and how you want to view the others layers (transparent, hidden or 100% visible).
In the bottom portion of the screen you can see all the available output options. Let’s see what can be set for each output.
These 2 types of outputs have an option called "Placeholder", that is, the image that you want to see while editing your project. For the card output, you can choose any of the 52 cards to appear on the screen. But, in the case of an image output, you can choose any of the images that you've previously imported.
However, at the time of the performance, those outputs react in differents ways: if the card output has no linked input, the placeholder will be used instead in the final image. This is useful if you want to add a forced card to your project: just set the desired card under "Placeholder" and leave the linked input as "None".
An image output must have a linked input in order to work, otherwise the final prediction image won’t be generated.
You can see how each option affects your output in real time. Use them to make your output look as natural and realistic as possible in relation to the base image.
As mentioned before, a card output will most often be superimposed over a blank card (as you can see in our base image example). But, of course, you can - and indeed, you should - use your creativity to come up with other uses for this.
If your linked card input uses 1 digit, your output will show a ESP card. Using 2 or 3 digits your output will show a ordinary playing card.
Image outputs allow you to layer other pictures over your base image. For example: you can use an image output to put dice in your prediction, or everyday objects, or whatever you like.
Use a text output to add text to your image. Like the other output types, you can distort and reposition the text by dragging the corners of the layer. In addition, you can configure:
Here you define the text that you want to insert in your prediction. Note that extra buttons will appear above of your keyboard. They are used to insert input variables into the text. You'll be able to add to your text:
You'll see that the identifiers of the inputs are used in the text as variables, in the format $identifier;. ($ followed by the identifier defined to the input followed by ;). At the time of the effect, the identifiers will be replaced by the values entered on the fake lock screen.
You can choose the desired font for your Output Text. All standard iOS fonts are available, plus more than 40 exclusive fonts with handwriting.
In addition, you can configure:
When you insert a Card Input variable within text, the app will use the words defined under the option "Output localization" to substitute that variable. If the app can't find the given word under "Output localization", the translation defined under Settings ⇢ localization will be used instead. This way, you can define specific words in your native language under "Settings" and, if you need to create an output in another language, you can overwrite the words that are used by any specific output under the option "Output localization".
"$card1.rank; of $card1.suit;"
will result in:
"Jack of Spades"
(for the input 45 with the stack “Juan Tamariz’s Mnemonica” selected).
“Jack” and “Spades”, as well as the others cards and suits, can be translated under Settings ⇢ localization or within the output on the option “Output localization”.
Use a QR Code output to add a QR Code to your image. You can type anything as the QR Code content under the "Content" field. You can also use variables, just like the Text Output, so your QR Code can show a text prediction when tagged or even a URL.
This output is exclusive to TAP PRO users. Learn more about it under Settings > TAP PRO
You can use the Mask option to remove unwanted parts of your output. You can find it by selecting the desired output and scrolling to the end of the options list. In our example, the card output should be partially hidden:
To see what you’re doing with your mask, you can change your view mode to “Overlay”, so the mask will be temporarily visible as a semi-transparent, red overlay.
You can alternate between the brush and the eraser by clicking in their respective buttons. Clicking the selected button again will disable it, making it easier to pan and zoom your image without ruining your mask with unwanted strokes.

On the main screen of the Outputs tab you're going to see a list with your created outputs. You can reorder your layers by touching the right side of the layer and dragging it.
On the left side there is an eye icon which, when tapped, hides or displays a layer.
Hiding a layer is only temporary, it's there just in case you need to check something out. When editing another output or generating the final prediction image, the layer will continue to appear normally.
By swiping an output from the list to the left you can erase or duplicate it.

The final prediction on your Camera Roll is created at the moment of the performance, but your spectator doesn't know that. He thinks that the photo has been there all the time. To further assist this perception, you can use the tab "Filters" to apply a final filter to your image. So your prediction not only appears to be on your Camera Roll, but pass the impression that has been carefully edited, something that the spectator won't see you doing on the moment of the performance, serving as a subtle but effective extra convincer.
Apart from that, the filters can be used to reach any specific look that you would like your prediction image to have.
Open the tab "Filters" and you'll see the list of all the available filters. Select them to display a preview of your final image result.
You won’t see the selected filter while editing your project on the "Outputs" tab, but it will be applied to the final image.

So far, you've already seen how to define the info that you will use with the Inputs, how to add information to your image, using Outputs, and how to stylise your prediction image with Filters. But you can do even more!
Under the tab "Options" you'll see some extra configurations that you can use in the effect, making it even better!
When you take a photo, your device registers the date and time the photo was taken. Here you can set the date and time of your prediction. You can choose from 3 different models:
In this mode, you can set a date relative to the time at which you perform the effect. For example, you can select "3 days ago". If you perform the effect at 10:00 AM on August 30th, the photo will be saved as if it was takes at 10:00 AM on August 27th!
You can choose:
Yes, it is possible to choose a date in the future! So, the photo will naturally be the last one on your list in the Photos app, with a FUTURE date! Think of all the scripts you can create with this! :)
If you want the photo to be saved with the date and time of the performance, simply select "0" (zero) on first column.
With static mode, you set a specific date and time and your prediction will always be saved with that date.
This option is quite versatile. Here you can individually specify the day, month and year of the photo, plus the hour and the minute.
By clicking on each item, you can enter the desired value. In addition to numbers, you can use inputs as parts of the date! This way, you can use the date the photo was taken as another prediction.
Once you have the following inputs:
Your final image contains the prediction of only one card, which will be chosen by the spectator (input 1 - Card). By adding the 2 other inputs, you can also ask the spectator to name a day of the current year.
In the project "date and time" option, you can configure it this way:
$number1;$number2;In this way, the photo will have the spectator's chosen card which will also be saved at the date chosen by the spectator! So, with virtually no work, you have just turned a card prediction into Any Card At Any Date! ;)
Note that, apart from the variables, you can use ordinary numbers as parts of the date. If any item is invalid (due to invalid characters or missing variables) the photo will be saved with the date and time of the performance.
Only the input numbers will be used on a date, that is to say, it’s ok for you to use an Input Word as the month of a date, because only the Input Word number will be used.
This can be useful if, in addition to saving the photo to an input-based date, you want to add the same information to your image.
No check is done to verify whether your input is valid, or not, for that date.
For example: trying to save a photo on the 50/13/2018 will cause the image to be saved on the 19/02/2019, because the 13th month gives the result January (December + 1) and the 50th day gives the result 19/02 (31 days in January + 19 days in February).
If the date has any invalid characters, the photo will be saved as the current date and time.
Besides your input identifiers, you have some global variables to use in your calculations: $NOW; and $TIME;. Global variables are always written in uppercase, so you can easily differentiate them from your custom input variables:
This variable will be replaced by the time of your performance. This can be useful if you need to use the date and time of performance in your calculations. To use this variable, you need to write it followed by the date component you want to use: $NOW.day;, $NOW.month;, $NOW.year;, $NOW.hour;, $NOW.minute;, $NOW.second; and $NOW.weekday;.
"I'm pretty sure I'll meet someone in July, maybe a Tuesday, who will choose a Queen of Diamonds!"
To do that, all you have to do is to create new inputs for the month and for the weekday, like this:
which$month: Word Input
Words: 1: January, 2: February, etc.
Calculation: Number = $NOW.month;
$weekday: Word Input
Words: 1: Sunday, 2: Monday, ... 7: Saturday.
Calculation: Number = $NOW.weekday;
Now, our text should be like:
"I'm pretty sure I'll meet someone in $month;, maybe a $weekday;, who will choose a $card1.rank; of $card1.suit;!"
You can also use the $NOW variable directly within the fields of the section "Date and time 'from inputs'". We'll talk about this later on.
Similary of the $NOW variable, $TIME will be replaced by the time of prediction. For example: if your prediction is set to be saved with a timestamp of 4 weeks ago at a random time, this variable will be replaced by that exact time. This can be useful if you need to use the date and time of your prediction in your calculations. To use this variable, you need to follow it by the date component you want to use: $TIME.day;, $TIME.month;, $TIME.year;, $TIME.hour;, $TIME.minute;, $TIME.second; and $TIME.weekday;.
"Today, July 7, I had a dream that it was someday in July, maybe a Tuesday, and someone chose the Queen of Diamonds!"
Besides the 2 inputs created in the last example, you're going to create 2 new ones:
$predictionmonth: Word Input
Words: 1: January, 2: February, etc.
Calculation: Number = $TIME.month;
$predictionday: Number Input
Calculation: Number = $TIME.day;
Now, our complete prediction text should be:
"Today, $predictionmonth $predictionday;, I had a dream that it was someday in $month;, maybe a $weekday;, and someone chose the $card1.rank of $card2.suit;!"
$TIME variables can only be used within inputs calculations.
Create a solution to show the day in english format: 7th, 13rd, 21st, 22nd, 23rd etc. By doing so you'll learn how to solve simple problems with new inputs and some simple calculations.
By enabling this option, a random time will be assigned to the date set in the previous option.
If the date is set to “1 day ago” and the “Random time” option is enabled, the picture will be saved as if it was taken the day before the performance, with time of day (or night) being chosen at random.
If you enable the random time option and your date may result in the same day of your performance (for example: 1 hour ago), the picture may be saved as a date in the future, because the app can choose any time within the 24-hour clock cycle.
Just as with the picture’s date and time, your device also registers the picture’s location, at the time it is taken. With TAP you can choose the location of your prediction. It can be useful as a convincer.
If you’re performing an effect where the prediction picture was taken in a specific place, you can set that same location with this options. This way, when opening the picture, the spectator will see that the picture’s location matches your script.
To remove a location previously set, just swipe the row named “Picture’s location” to the left and tap “Clear”.
This option can be an excellent convincer too. By enabling it, the picture will be saved in your Camera Roll as a Favorite, as if you had manually favorited the picture. All photos marked as favorites also appear in the “Favorites” album in your device, which can make it much easier to find your picture, especially if the prediction’s timestamp has been set to a distant date.
Sometimes you may want the prediction image to be saved with a different resolution from the original base image. This can be useful if your base image is too large, thus delaying the generation of the prediction image. Under this option, you can define a percentage of the size.
A smaller image can be used also as convincer a if your script says you got the prediction from the internet, for example.
The default value for this option is the recommended size, that is, the largest resolution smaller than 4000x4000. If your image is taking too long to be generated, try lowering your image scale.
It can be useful to have your prediction images saved to a specific album in your Photo Library, making it easier to find the generated pictures and to take control of them, (to delete them before new performances, for instance). You can set the album name to whatever you want. If the album doesn’t already exist, TAP will create it for you, before saving your prediction. The default value is “TAP Performances”.
If you don’t want your prediction be saved to any specific album, just leave this field empty.

This last tab will help you test your project. Here you can type the 6 digits, simulating the spectator choices, as if you were performing, and to see in real time how the picture will be viewed with these digits.
It's important to test your projects to:
It's important to enter the passcode in the fake lock screen just as you would do in the real one. If the magician thinks too much before inserting his passcode, he will be demonstrating that something is wrong, because normally you would know your passcode by heart. Test out different scenarios with different answers, until you feel confident enough to perform your effect.
The higher the number of outputs and the older your iPhone, the longer your image will take to be generated at the time of the performance. When generating the photo, the test screen displays the image along side the time it took the app to generate it. This way, you will have a good approximation of the time the app takes to generate the image during your performance, before it closes.
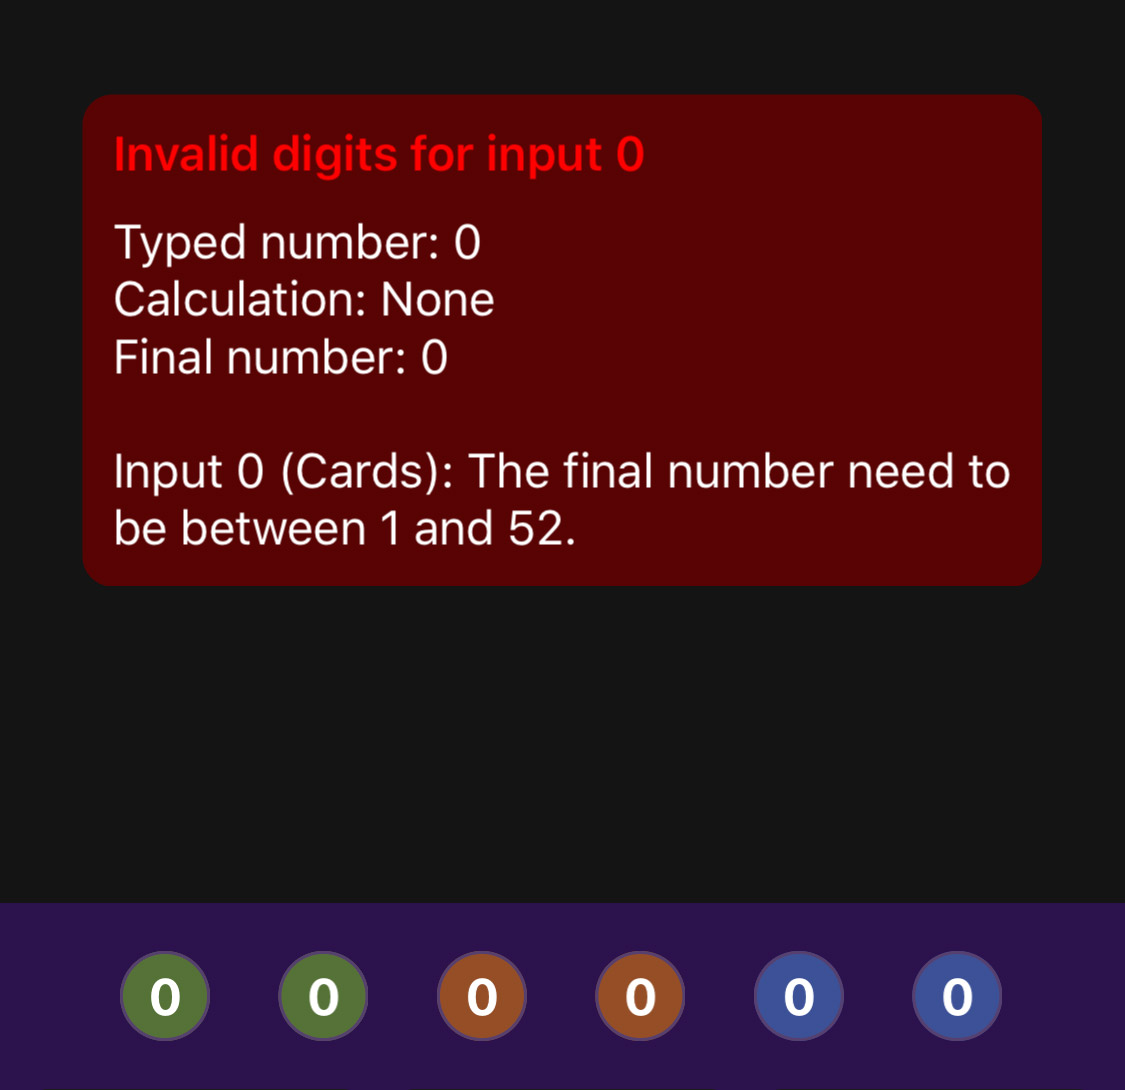
If you enter an incorrect digit in the passcode (for example, if you enter 55 in a card input without calculations), the test screen will display a detailed error message indicating why the password was considered incorrect. It's a great way for you to test whether your project is working properly and, if it is not, to find out what's wrong with it.
Now that you have a better understanding of how TAP works and how you can create your own projects, we will learn more about some extras points that are of extreme importance to a total understanding of the app.
The easiest way to perform an effect using TAP is to enter the passcode yourself. Select the desired project, click "Perform" and lock your phone.
Proceed with your script normally. When revealing the prediction, unlock your phone casually in the normal way using your iPhone's biometric (Touch ID or Face ID). Act as if the biometrics did not work, (the Touch ID feature doesn't work very well if you have wet or sweaty fingers, and Face ID sometimes fails to recognize your face, either because your eyes are covered or not looking properly at the device). At this moment you casually shows the passcode screen (which is actually the fake screen from TAP) and insert the digits with the inputs.
Let’s say you have these inputs:
The spectator choose the 8 of hearts (card number 14 of Juan Tamariz’s Mnemonica) and the number 37, so you will type the following passcode:
Note that the last 2 digits aren’t being used, so you can type any number.
When you type all 6 digits, an unlock animation will be shown, the prediction’s picture will be generated, then saved, and the app will close by itself. At this moment you give your device to your spectator and ask him to look for the picture in the Photos app.
Before executing the effect, leave your Photos app open at the first tab, where the photos are organized by date. If the spectator opens the Camera Roll, the "All Photos" album will show the last photo generated by the app, which may not be exactly what you had in mind for your effect, (especially if the date of the photo is older).
Try to place the Camera app icon as far as possible from the Photos app icon on your Homescreen. That way you prevent the spectator from opening the Camera app to see the photos, which is fairly common practice. If the viewer opens the Camera app, it will also display the prediction photo as the latest shot.
But… what if you want your spectator to see you typing in the passcode? It's quite possible he doesn’t know that the number 14 represents the 8 of hearts, but he’s sure to notice number 37 right there in the middle of your passcode. Here's we can also use the option Calculate for the inputs (read more in "Calculation" section).
Let’s say you have an effect where you’d like to have a prediction that includes the name of the spectator. Of course you’ll add a text output to do it. An option would be to edit the project every time you want to perform the effect, but it’s by far the less practical way to do this. For these situations exists the Pre-show Manual Input.
The manual input isn’t associated to any digits. Instead, it is entered before the performance. In our example, let's say you wanted to add a manual input with the identifier “name”. This variable ($name;) can be used normally like any other one, inside your text outputs.
Besides the identifier, you can also assign a default value to the manual input, in case you want to start your performance without filling it in. In our example, using manual input to insert the spectator’s name, a plausible default value would be “Someone”. This way a text “$name; will choose the number 31” will be “David will choose the number 31”, in the case where the magician enters “David” for this input. If no name is inserted, the text will be “Someone will choose the number 31”, so the phrase will still make sense.
When you select a project and click “Perform”, the app will ask you to enter the manual inputs. Normally you’ll do that as soon as you have the information you’ll be using, (in our example, the name of the spectator), but it can be a while before you are performing the effect to your spectators.
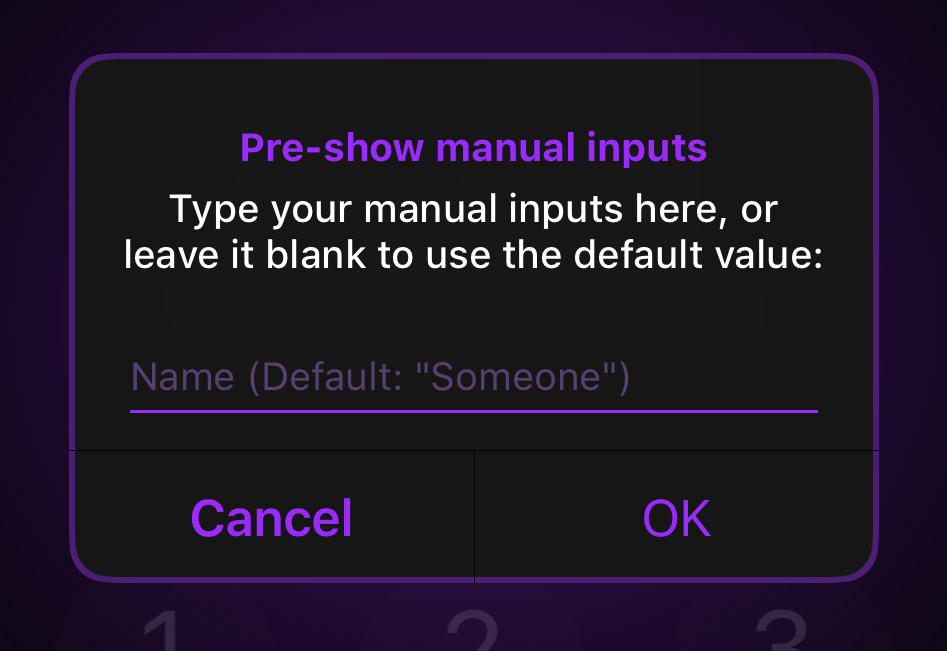
Lastly, you can specify a title for your manual input. It can be be used as a reminder of the content you expect for that input.
An interesting feature of TAP is that you can select any digit, in any order, to create the inputs. The only limitation is that each digit can only be designated to a single input, that is, you can have a maximum of 6 inputs using digits (excluding the manual inputs and inputs created with no digits).
This means that in addition to using the calculation to disguise typed numbers, you can use digits out-of-order, for the same purpose.
An input can be designated to the first 2 digits:
So entering the passcode 123456 would result in the number 12 for the input (first and second digits)
Or you can assign the first and last digits for the same purpose:
In this way, entering the password 123456 would result in the number 16 for the input (first and last digits)
Or use the digits in another order:
In this way, entering the password 123456 would result in the number 61 for the input (last and first digits).
The order of the digits of each input is shown inside the circles at the top part of the "Inputs" tab. You can also reorder them by tapping the "Reorder" button.
This screen is shown when you start the effect (by choosing a project and tapping “Perform”) . It simulates your real lock screen, where you enter the passcode to unlock your phone and that's exactly what you want your spectator to think.
To make this screen as close as possible to your original screen, you go to the Settings section and import the image that you use as the background for your original lock screen. If you no longer have this image, (perhaps you are using an original wallpaper from iOS and therefore do not have access to the image), you can take a screenshot of your lock screen and import it, as this image will appear blurred on the fake screen.
If you choose to take a screenshot for your lock screen background, it’s important take this screenshot with the lock screen as clean as possible (no notifications on display, for example). You can also use third-party apps like Snapseed to erase the date, time and buttons from your screenshot.
Still within Settings, you can define the text used on the lock screen. This text is originally in English, but you can translate these keywords into your native language. To do this, go to Settings ⇢ General Localization. You also translate the words that are used to represent the cards (“Ace”, “Jack”, “Diamonds” and so on). These words will be used in all your projects, unless you define otherwise in your Text Output.
The buttons at the bottom of the fake lock screen have some secret functions:
When you enter the 6 digits, TAP will check if the digits are valid. If they are not, you will see the digits swing and the cell phone will vibrate, just as it would on your actual lock screen. If they are valid, the app will display an unlock animation, as if your phone was in fact unlocked. At the end of the animation, the prediction image will be generated, saved on the device and the application will close automatically, transitioning to your real home screen.
This change between the fake and the real homescreen occurs really quickly. Most of the time it will happen seamlessly and neither you nor your spectator will be able to see it. But sometimes, (when your device is too busy, for example), you may see a black screen flash briefly when transitioning between the fake and the real homescreen. This is perfectly normal! But don't worry, the spectator won’t perceive it as long as you don’t draw attention to it, (be honest: we've all experienced some sort of strange behaviour on any of our computer devices, so seeing this black flash isn’t that weird). This is a default iOS behaviour and the app has no control over whether it flashes or not.
As seen before, you have 2 options when using card inputs: using 3 digits to input the rank and the suit separately or using 2 digits to input the card's position in a stack.
TAP already include some popular stacks, but you can create your own if you prefer to use a different one. To do that, go to Settings ⇢ Stacks. There you'll find the list of default stacks.
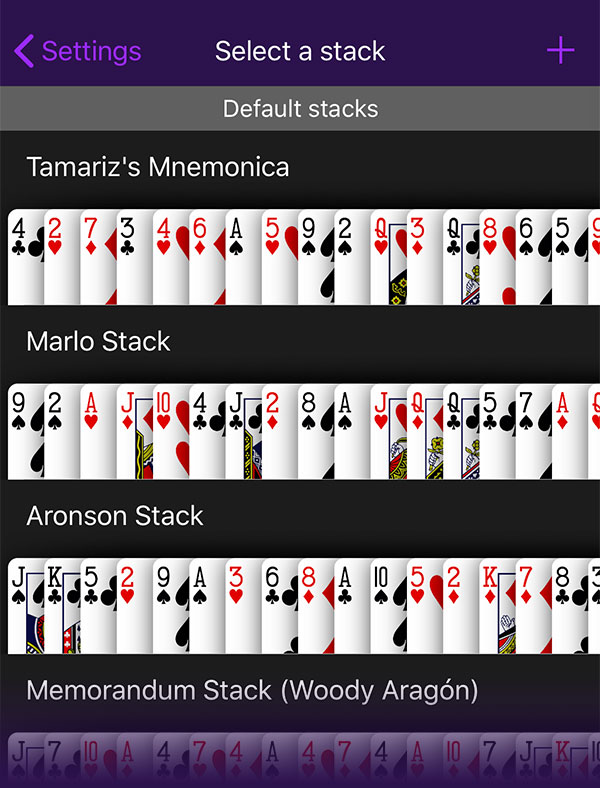
By swiping horizontally over the cards you can see all the cards from a stack.
By swiping the stack name portion to the left you can duplicate a stack, useful if you need to create a new one based on another.

If you want to create a new stack from scratch, just tap the "+" (plus) button at the upper-right corner.
At the bottom part of the screen you'll see all the unused cards. By tapping a card or dragging it to the upper section you'll add the card to your stack. Keep doing that until you have added all 52 cards.
Finally tap "Save" (the button won't be available until your stack is complete). Give it a name and you're done! Now you can use your custom stack in your inputs. And of course: you can create as many stacks you want.
Creating a new stack just adds it to TAP. It won't be used until you select it within your desired inputs.
When selecting a project for a performance you will see a complete summary, showing the main project settings and their respective inputs. This way you don't have to worry about having everything memorized (although you should! :P): you can take a quick look just before starting the effect and thus avoid any possible mistakes.
You can easily export your projects, so you can share them with other magicians, or even just to keep a copy of your project somewhere else, as a backup. To do that, simply swipe the project row to the left in your projects list and tap “Export”. The app will create a file with the extension *.tapProject, that can be shared, just like any other file. Opening this file on your phone will automatically open TAP - if it’s installed - and start the import process.
Everytime you perform using TAP, the app will log your performance. You can see your history of performances under "History" menu item. There you can see your performances and their info: generated image, digits used, manual inputs values, timestamp of the picture and more.
You can also use the history to remove your generated images from your Camera Roll, or even edit a generated image using different digits. By doing so, your previous generated picture of a selected presentation will be deleted and a new one will be generated and saved in place.
Under Settings there is an option that, if enabled, will look for old generated predictions in your Camera Roll every time you open TAP. If any are found, TAP will show a red count badge over the "History" item on the main menu (or a small toast notification if you're on the Projects list). Tap the icon to delete the old predictions from your Camera Roll (a confirmation asking your permission for deletion will be shown).
TAP PRO is a subscription service that expands the possibilities of TAP even more with exclusive features.
You will be able to integrate other services with TAP, such as Inject, WikiTest and Earworm, add QR Codes to your predictions and even create custom URL for your projects, allowing you to integrate TAP in various different ways.
The features list will grow over time, and by subscribing to TAP PRO you support the app development, helping us to bring even more exciting features in the future!
You can find more information about TAP PRO (prices, features and specific instructions) under Settings > TAP PRO.
The Architect of Predictions was designed to be the Swiss Army Knife of Predictions, using just your phone. The way the effect is structured makes it virtually impossible for the viewer to backtrack on the method, and you have complete freedom to create different projects for different effects and scripts, all within TAP.
If you have any questions, suggestions or criticism, please use our Facebook group, that way others can participate. :)
TV performance rights are NOT included with purchase. All TV rights are reserved and available from Gui Del Frate. Please contact Gui at me@guidelfrate.com for details.